
Thursday 26 November 2015
PROGRESS ....at long last!
Well, we have moved!
Still doing maintenance to the house, as one does to personalise the house to suit ones own tastes and needs.
As it turned out I wasn't able to fit the 20' x 40' mancave in, so have had to settle for 20' x 30'.
The erectors can in this morning and have the frame up.
Unfortunately the guys weren't prepared to try to put the sheeting on as it has been blowing quite hard so that is happening tomorrow all being well.
Once that is done the sparky can block on all the wiring and then I have to get on with the plastering.
Have not even been able to do any modelling in the house as we have stuff everywhere until the trainroom is finished.
Below is a pic of framework erected.

Friday 21 August 2015
Overdue Update
Hi Everyone,
Nothing to report layout wise.
We have sold, and move in 2 weeks and 6 days (NOT that I am counting)
Been busy packing and dismantling the last of the old layout. Packing books, models, modelling tools.
I just didn't realise I had so much stuff until it came time to pack and repack some of it.
The new place we have bought, needs a studio/trainroom, so that will be the first priority once we are in. Hopefully I will be able to fit in another 20x40. Just need to double check space with the easements on the property.
Sunday 12 July 2015
Another small update
Well, I have glued all the sections of platform and roadway around the station area, and started to prep the edges of the road for quartz/stone edging.
(Note, I have actually taken pics while working)
It's all now about trying to get road and path levels right at the station end.
Given the time period I am trying to model is the 1938-41 period, I am reliant on pics for this. Although, I suppose that there are not that many modellers from that era nowadays who would be to concerned with how accurate it is, but nonetheless!
I have taken out a 2mm section of the mdf which will be filled with DAS clay then suitably scribed for the stones.
 This is the end where the loading bank is.
 Roadway down to the station. Just shellaced to seal the mdf.
 Lifting a section of the mdf for the stone work using a podiatrist blade in the knife holder.
(Note, I have actually taken pics while working)
It's all now about trying to get road and path levels right at the station end.
Given the time period I am trying to model is the 1938-41 period, I am reliant on pics for this. Although, I suppose that there are not that many modellers from that era nowadays who would be to concerned with how accurate it is, but nonetheless!
I have taken out a 2mm section of the mdf which will be filled with DAS clay then suitably scribed for the stones.


Saturday 4 July 2015
Two steps forward, one step back, then forward again
Well as the title says....Have had a little hiccup, I stuffed up the Goods shed.
Easily solved, cut away the superglue joints and Bob's your uncle....WROOOONG!!
Basically I tried to allow for the station when looking at the plans of the Goods Shed. (One wall sits on the platform) I figured the plan was wrong ( which it is to a degree) What it doesn't show is where it is stepped for the station platform, so I did the obvious thing, allowed for it all around.
It just didn't look right. When the pennies dropped, I tried to separate the joints. Seems the Palight gave out first.
Not to worry, the other thing I had forgotten was the internal walls of the Goods shed, to mark and paint them. It is now done.
On the subject of internals of the Goods shed I am still trying to find some definitive answer to the construction and internal shape of the Goods shed platform.
One response on RM Web, the responder said that they removed the Stone Platform to allow them to work on the loco's inside the Goods shed. (I have seen pics of the DVR loco's there) The problem was, he then posted pics of the carriage shed. He hasn't responded since unfortunately so I cannot query him.
Readers may ask why be so pedantic about it, given I am modelling in OO and not P4.
It is just me. There is another major flaw with the layout but I am not pulling up track and altering the crossover now. The rails are about 1 1/2 ft to close together at the platform.
I am trying, and have tried to date to get this as right as I can with all things considered.
So, today I got the camera out and placed the buildings where they are going to be to see how it all looked.
 Where the posts of the carriage shed should line up with the edge of the Cattle dock it now won't due to the track being that bit to close together. Have bought the brass wire to finish off the internal framework for the carriage shed...just have to do it!
The new Goods shed. The roof angle of the old one was out a bit as well. You can see in the way the roof is just sitting there at the moment. The loading dock is getting there as well.

Another view showing the front of the Station with the verandah down on the roadway. The ramp of the loading dock is not secured here either.

Another view of the whole station precinct.
News to hand is that the Master Plan for Ashburton has been approved. At this stage it does not bode well for the Station Precinct.
Easily solved, cut away the superglue joints and Bob's your uncle....WROOOONG!!
Basically I tried to allow for the station when looking at the plans of the Goods Shed. (One wall sits on the platform) I figured the plan was wrong ( which it is to a degree) What it doesn't show is where it is stepped for the station platform, so I did the obvious thing, allowed for it all around.
It just didn't look right. When the pennies dropped, I tried to separate the joints. Seems the Palight gave out first.
Not to worry, the other thing I had forgotten was the internal walls of the Goods shed, to mark and paint them. It is now done.
On the subject of internals of the Goods shed I am still trying to find some definitive answer to the construction and internal shape of the Goods shed platform.
One response on RM Web, the responder said that they removed the Stone Platform to allow them to work on the loco's inside the Goods shed. (I have seen pics of the DVR loco's there) The problem was, he then posted pics of the carriage shed. He hasn't responded since unfortunately so I cannot query him.
Readers may ask why be so pedantic about it, given I am modelling in OO and not P4.
It is just me. There is another major flaw with the layout but I am not pulling up track and altering the crossover now. The rails are about 1 1/2 ft to close together at the platform.
I am trying, and have tried to date to get this as right as I can with all things considered.
So, today I got the camera out and placed the buildings where they are going to be to see how it all looked.


The new Goods shed. The roof angle of the old one was out a bit as well. You can see in the way the roof is just sitting there at the moment. The loading dock is getting there as well.

Another view showing the front of the Station with the verandah down on the roadway. The ramp of the loading dock is not secured here either.

Another view of the whole station precinct.
News to hand is that the Master Plan for Ashburton has been approved. At this stage it does not bode well for the Station Precinct.
Sunday 7 June 2015
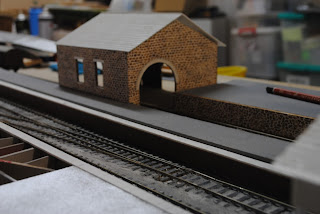
Engine Shed
Working on the Engine shed currently.
Still a lot of painting to do, slates, brickwork and timberwork, as well as make the windows and doors.

Top section of roof has been made separately, but will be glued once the painting is done.

Top section of roof in place.

Chimney is made for the Crew room but won't be located until all is painted.
Probably not a lot to say really.
Picked up the brass wire to go on with the trussing of the carriage shed, so that will be on the go in the not to distant future.
Thursday 28 May 2015
A combination of posts...still learning this craft of blogging!!!!!!
Seems I still have a lot to learn about this blogging lark. Have been creating "PAGES" and NOT posts.
Hopefully I have worked it out, so now to the catchup.
Been working on the roadway to the station a bit more. It seems that 47mm does NOT equal 55mm. Absolutely no idea where I got 47mm for the platform width, given that I have it written down on the drawings that it is 55mm.
Ah well, a bit of cut and add....situation sorted.
I have just finished painting the Station building. No grouting colour has been added yet and I hope that when it is it will tone down the orange of the brickwork a bit more, otherwise I will have to repaint the brick quoins.
The colour of the stonework looks better than what I have done on the Goods shed, so the Goods shed will have to be darkened!
Just add it to the list of things to do.
I have missed putting in the pic so will show it later, of the station building painted.
Started the task of cutting individual slates, and have a nice collection, as can be seen below:

I started to put them on....what a pain/eyesore. Not sure how the pros do it but apart from driving me batty, it looked terrible. I can only think that I wasn't allowing enough gap between them. Some were OK but quite a few virtually joined as one with the Limonene.

Start again.
Did it in strips and has worked very well. Unfortunately I haven't taken a pic as yet of the slates in place on that roof.

Above is the carriage roof upside down. I had marked and grooved the underside of the shed roof a while back. The underside of the roof boards were laid at an angle.
At the moment this is as far as it is going to get until I can resort the steel, in this case the brass trusses that support the roof. I did use a jig to help locate them but with the movement of the styrenne, it hasn't been as good as it could have been so I have to realign a few of them, so that I can solder in the lengthwise ones and then the cross bearing ones.

Last but not least is a pic of the roof in place on the station building. Never mind the sanding block that is representing the platforn there. :)
Well that is the combined update, and I shall keep at it.
Thursday 7 May 2015
A Little Update
This is just a basic update to let one and know I am still working on the layout.
At the moment there is more than one thing on the go.
Started to paint the platform faces, the goods siding one can be seen in one of the pics below. Assembled the Station building, so that I could complete some of the platform and road foundations, and have continued on with this foundation work. (Painting plaform faces is a loooong and tedious job)

In this overall shot you can see the station and Goods Shed in place.
Just behind the station is a sheet of card which is the base sheet for the roadway. further layers will help form the fall of the road to the gutter at the front of the station.
I'm using mdf for the main grid work to support the roads and paths. The card at different thicknesses with help form the contours as required.

In this image the painted section (not completed) of the back of the station platform can be seen as well as the formwork for the loading bank and roadway accessing Tuckers Maltsters.
All the formwork, for example the loading bank are seperate pieces at the moment, so that they are easy to handle to work on. The section of roadway with the card on it, is also seperate to the section around the station building which is seperate again to the platform.
Once I am at the final stages it can all be assembled together and glued.
Until the next update!
At the moment there is more than one thing on the go.
Started to paint the platform faces, the goods siding one can be seen in one of the pics below. Assembled the Station building, so that I could complete some of the platform and road foundations, and have continued on with this foundation work. (Painting plaform faces is a loooong and tedious job)
In this overall shot you can see the station and Goods Shed in place.
Just behind the station is a sheet of card which is the base sheet for the roadway. further layers will help form the fall of the road to the gutter at the front of the station.
I'm using mdf for the main grid work to support the roads and paths. The card at different thicknesses with help form the contours as required.
In this image the painted section (not completed) of the back of the station platform can be seen as well as the formwork for the loading bank and roadway accessing Tuckers Maltsters.
All the formwork, for example the loading bank are seperate pieces at the moment, so that they are easy to handle to work on. The section of roadway with the card on it, is also seperate to the section around the station building which is seperate again to the platform.
Once I am at the final stages it can all be assembled together and glued.
Until the next update!
Monday 27 April 2015
The Goods Shed
Started to paint the Goods Shed.
I started with the back wall, that hopefully won't be seen much, if at all.
Given I wasn't happy with the first results, and the fact I did NOT sand down the top surface which it needs for the paint to adhere, I thought I was in diabolicle trouble, to the point I was going to make a new wall.
Last resort, a small hand held wire brush.
WONDERFUL!
Not only did I get rid of the top surface for easier and better painting but the wire brushing was enough to to leave a paint residue, which doesn't look to bad for older cement. by the time it is weathered I believe it will come up reasonably well.

The back wall.
The orange of the bricks is still to bright to my eye.

This end wall has had a paint and wire brush. Blank space is for the timber office.
Oh well, back to painting!
I started with the back wall, that hopefully won't be seen much, if at all.
Given I wasn't happy with the first results, and the fact I did NOT sand down the top surface which it needs for the paint to adhere, I thought I was in diabolicle trouble, to the point I was going to make a new wall.
Last resort, a small hand held wire brush.
WONDERFUL!
Not only did I get rid of the top surface for easier and better painting but the wire brushing was enough to to leave a paint residue, which doesn't look to bad for older cement. by the time it is weathered I believe it will come up reasonably well.
The back wall.
The orange of the bricks is still to bright to my eye.
This end wall has had a paint and wire brush. Blank space is for the timber office.
Oh well, back to painting!
Thursday 23 April 2015
Catchup Pics
A couple of pics of the layout to date.
 Taken from the terminus end, the platform for the stock yard, and part of the station platform can be seen.
 This shot is of the station and yard entrance.
 Had to check the points and electricals were operating correctly.
Wednesday 22 April 2015
Long story short.
Started to model Maiden Newton in OO (all 40'of it incl. curves at each end).
Have put the house on the market as we are finding it to hot here in the summers and wish to move south (would rather move to the UK but alas, finances won't permit that) where it will at least we will get more cool changes in the summer than up here, where 40 plus degrees for days on end is not uncommon.
So, Maiden Newton was dismantled and packed up. I needed to model something that I could pack away quickly and easily in case the house should sell. Went through the four books of GWR trackplans and settled on Ashburton as being a small BLT. (about 12')
The layout consists of 2 boards with 3x2 pine framing and mdf on top. One is 8'long and the second is 4'long.
The track has already been laid using C&L flexible track.
Points are handmade on pcb sleepers.
Points operation is WIT (wire in tube).
Electrics are DC.
Controller is handbuilt from circuit published by Dukedog on RM Web.... here .
Buildings have been started using Palight plastic. My thanks to Geoff Forster for suggesting it as a possible option for making buildings from. His Blog is "http://radnorailways.blogspot.com/feeds/posts/default" which should show up on the side (I hope)!
With luck I shall take photo's tomorrow of where I am up to and hopefully more as things progress.
Subscribe to:
Posts (Atom)